Published on Tuesday, 12 March 2024 at 4:26:00 PM
Welcome to #TimeWarpTuesday as we get a little bit technical and talk about how to keep and store your old photographs and documents to ensure they stay accessible in years to come. With thanks to the Archives Unit of the Australian Institute of Aboriginal and Torres Strait Islander Studies (AIATSIS) for allowing us to make copies of their notes.
STORAGE STRATEGIES FOR YOUR HOME ARCHIVES
- Part One –
Whilst the world is increasingly going digital, there are certain documents and photographs that we have and will probably always have in our homes in a physical format. This is particularly true in terms of items related to our family history and identity documents such as passports, birth, death and marriage certificates and other documents like educational certificates and the like. You may be surprised to learn that you don’t necessarily have to spend a lot of money on protecting all of these precious family documents that form your home archive. You can even purchase some items at the supermarket. But first a little more detail about photographs and documents themselves and the properties in them that come into play when deciding the best way to store your documents.
PRESERVING YOUR PHOTOGRAPHS AT HOME
Photographs are something we all take for granted in our homes, until 20 years pass and we start to notice them fading, changing colour or getting buckled and torn.
These outcomes aren’t inevitable, and this information sheet will help you extend the life of your photographs.
WHAT ARE PHOTOGRAPHS?
Photographs are more complicated than most people realise. Colour prints can have six or seven types of dyes and filters suspended in layers of emulsion. Black and white photographs have minutely divided grains of metal, generally silver, suspended in a binder.
There have been several different types of colour photographs used since the invention of colour photography. Only two are commonly available now. These are “chromogenic prints”, which are the standard snapshot you get back from the 1 hour processing shop, and the other is “dye diffusion transfer” or “instant” prints, most commonly referred to as Polaroids (because Polaroid, is the primary manufacturer).
Black and white processes dominated photography until colour took over, and the most common process by far is the silver/gelatine print. This is what most people have in a shoe box in the back of the cupboard. Other black and white processes that can be found in family collections in Australia are albumen prints (where the image is silver in an egg white binder) and gelatine printing out papers (these are like silver/gelatine prints, but the image becomes visible on exposure to light – it doesn’t require chemical development).
Photographs made prior to the 1970s are on good quality paper, which means that the paper itself doesn’t contribute to the deterioration of photographs. However, they are susceptible to physical damage like tears and insect attack. Modern colour and black and white prints are produced on “resin coated” paper. This means that the paper has a very thin layer of polyethylene plastic on either side of it. The coating serves to speed up processing time, and it also makes the prints stronger, and less prone to sever physical damage.
Fading or discolouration of images is due to the chemical break down of the image forming materials. With black and white images, the microscopic grains of silver start to oxidise and corrode like the tarnishing of jewellery or cutlery. This changes the shape of the silver grains causing them to reflect light differently. In colour materials, the dye molecules can split and become colourless. When one of three basic dyes which render all the colours we see in a full colour print begins to fade, the print appears to have changed colour, often to orange tones. This is because the blue dye layer usually deteriorates first, taking all the blue tones out of the image.
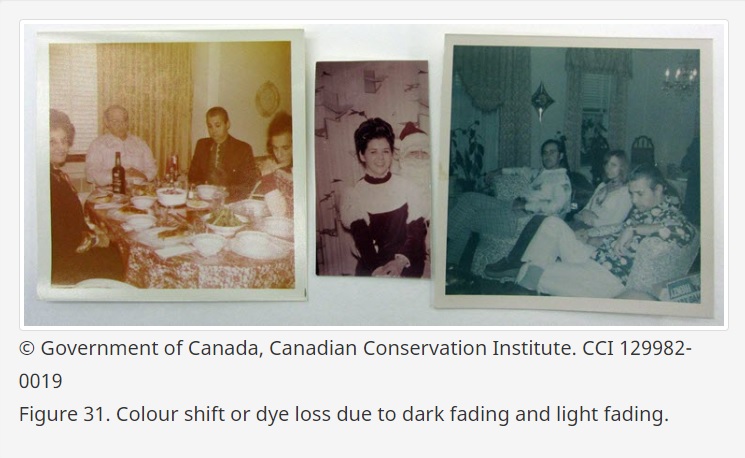
Examples of colour shift due to loss of dyes. Loss of each different dye leaves a different colour behind.
Courtesy of the Canadian Conservation Institute, Government of Canada.
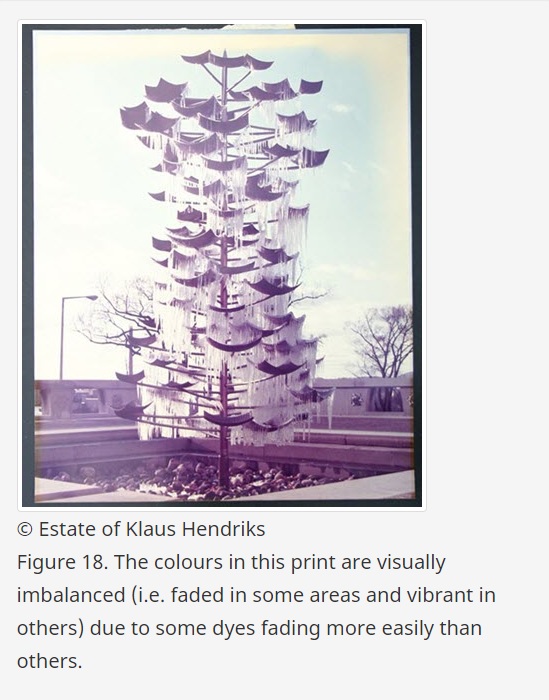 Dye fading to colour photographs.
Courtesy of Klaus Hendriks.
HOW TO CARE FOR PHOTOGRAPHS
It is the image forming materials which are the most susceptible to damage during the life of photographs. Fingerprints and poor storage introduce chemicals which will speed up any deterioration.
The paper supports can tear and crease, emulsions can stain, and fragile emulsions can be removed from the paper if wiped or rubbed.
HANDLING
When handling photographs you should:
- have clean dry hands (with no creams or lotions on them),
- wear cotton or latex-free disposable gloves if you like, but it is often difficult to pick up individual items with gloved fingers,
- old emulsion layers are easily scratched so handle the prints by the edge, to avoid touching the image layer,
- avoid handling fragile areas of the print, like dog-eared corners or tears,
- if the item is large and fragile (like a group portrait which has been rolled and squashed), support it on a piece of card larger than the item and handle the card, not the item,
- if you have been through your collection, and rehoused it in plastic sleeves, leave the items in the sleeves while you are referring to them,
- avoid prolonged exposure to sunlight. The high levels of ultraviolet radiation in sunlight fade photographs very rapidly.
If you want to write on a photograph, use a soft graphite pencil, and write on the back of the print. A slightly blunt 2B pencil from your local newsagent is perfect. Place the prints face down on a firm surface and write gently to avoid pushing indentations into the print. Pencil won’t write on resin coated papers, so you will need to find a pen with a black pigment based ink – these inks are the most permanent.
If you have a photograph which is torn, don’t be tempted to repair it with sticky tape. The tape will go yellow with age, stain the image and eventually fall off leaving you with a photo which is both stained and torn. Instead, lay out the pieces so that they fit back together even roughly, and take a photograph of the torn image, then put the photograph into a small plastic sleeve to keep all the pieces together. If you can, try and get the image copied so it isn’t being used too much.
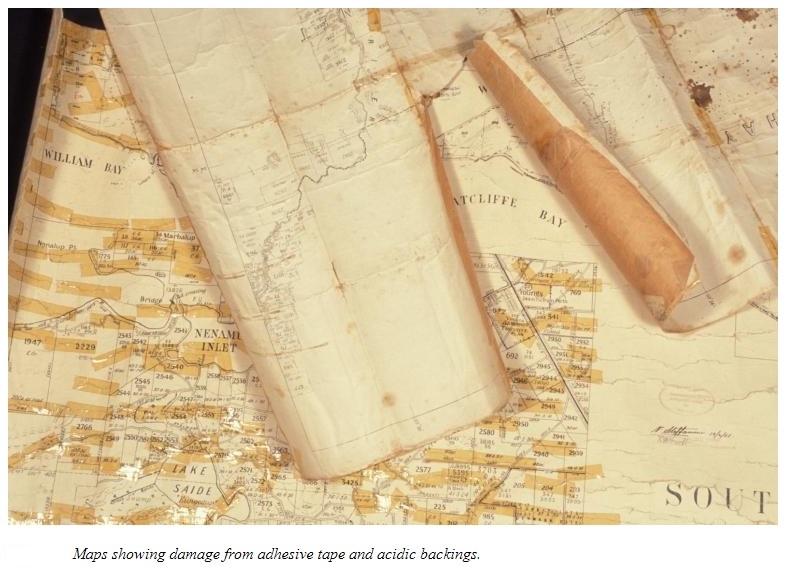
Damage to documents due to use of sticky tape - moral to the story - don't use sticky tape on precious documents!
Courtesy of the National Museum of Australia.
STORAGE ENCLOSURES
“Acid-free” does not necessarily mean “safe for photographs”. Photographs have different requirements to paper, so although acid-free materials are a good place to start they may not be the best thing you can buy.
Papers and plastics that have proved safe for photographs can be expensive, and reputable suppliers of archival materials sell them (see Suppliers at the end of this leaflet), however, there are more affordable alternatives. Things like clear plastic document sleeves available from stationary shops or newsagents and oven bags and zip lock sandwich bags from the supermarket are excellent alternatives. Food grade plastic containers also make storage boxes because they seal tightly enough to keep insects and water out.
The National Archives of Australia (NAA) has a list of materials on their web site that have passed the Photographic Activity Test (PAT): https://www.naa.gov.au/information-management/storing-and-preserving-information/preserving-information/preserving-photographs/about-photographic-activity-test. This list includes plastic sleeves and bags that can be purchased from your local shops, as well as products made specifically for the archival storage of photographic material.
If you are referring to your photographs a lot, use plastic enclosures that you can see through. If however, the photos will not be used it may be preferable to use paper sleeves, which allow better air circulation around the prints.
The choice of plastic to use is an important one. PVC plastic (polyvinyl chloride or just “vinyl”) should be avoided. This is the plastic that has that characteristic plastic smell and an oily quality to the surface. PVC will, over time, release vapours which are acidic and extremely damaging to photographs and paper documents. It can also cause some media, like photocopy toner, to soften.
“Good” plastics are polyethylene (HDPE and LDPE), polypropylene (PP) and polyester (PET). For archival storage, polyester is the most stable choice. Archival suppliers carry a range of products made out of these plastics especially for storing photos and documents.
If you live in a humid climate, like tropical north Australia, the choice of enclosure is a difficult one. Moisture levels can build up inside plastic sleeves, softening the emulsion layer and activating mould growth. Paper sleeves on the other hand will be attacked by insects pests like silverfish and cockroaches. The best compromise may be to file your collection into a plastic crate with a tight-fitting lid (to try and keep pests out), with sheets of paper in between each image to help absorb any moisture in the air inside the box. And keep your fingers crossed.
STORAGE ENVIRONMENT
Temperature is the most important consideration for a storage area for photographs. The cooler the better. But cold temperatures often mean damp conditions, which need to be avoided. High temperature and humidity levels will cause photographs to deteriorate rapidly. Avoid storing photographs in the attic, or the shed. Use an area inside the house that stays as cool as possible but doesn’t get damp and mildewy. A space with no external walls is best – like a hall closet or linen cupboard. The advantage of this kind of space is that changes in temperature and humidity are less dramatic. This is because the surrounding rooms act as a buffer, avoiding the highs and lows reached in other rooms.
These kinds of cool, quiet places are also the home of insects. If you use these spaces, you should check every few months to be sure silverfish or other insects haven’t moved into your collection. Silverfish will eat the cellulose of the paper support, and cockroaches will eat the gelatine emulsions. Avoid using moth balls or insect strips though, as these can cause photographs to deteriorate as well. Instead store your collection in something that insects can’t get into, like a box with a tight-fitting lid, or zip lock plastic bags.
DUPLICATION
If your photographs are becoming fragile, or you want to share your images among your family, it is a good idea to have the most important ones duplicated. This can mean having new photographs taken of the image, and printed on photographic paper, or scanned and printed through a computer. Black and white film is the most stable media to choose, followed by colour slide film, then colour negative film.
If you choose to have your images copied photographically, you can have your black and white images copied onto black and white film, and colour onto colour slides, or you can copy all of your images onto colour slide film. This ensures that any warm brown tones in your black and white images are copied as a brown tone, not neutral black and white.
If you are making colour prints from negatives, and even when you are getting your new photos printed, you should choose the most stable paper available, something like Fuji Crystal Archive™ if you can get it. Talk to the owner of the mini lab or camera shop about the best paper they can offer you.
Alternatively you may choose to scan the images on a computer. Many modern computer programs will help you correct any colour change and even electronically remove tears and stains. Images can be saved as files on your computer, printed out or burnt onto a CD for storage and distribution. Just be careful because electronic images in home computers and CDs aren’t strictly speaking archival storage as the technology rapidly becomes obsolete and the long-term stability of the CD materials is not yet known.
We hope you have enjoyed this look at the introductory side to photographs, how they were made and some of the effects of time, temperature, light exposure and storage can have on our photographic treasures.
If you would like help with scanning your photographs or documents, please reach out. You can get in touch with us via Ph: 08 9373 5500, E: vicparklibrary@vicpark.wa.gov.au, or drop in.
#LoveVicPark

Left: showing how albumen layer adhesive and silver image forming substance attach to paper. Right: Close-up of an albumen print surface that shows the signature overall fine cracking.
Courtesy of the Canadian Conservation Institute, Government of Canada, and Greg Hill.
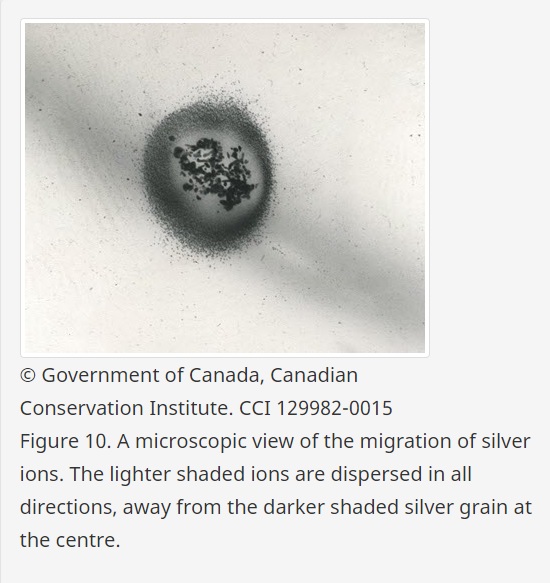
A microscopic view of the migration of silver irons.
Courtesy of the Canadian Conservation Institute, Government of Canada.
 Migrating oxidising agents and how they can effect other documents, e.g. when a poor-quality paper box is used to store photographs similar to in example.
Courtesy of Greg Hill
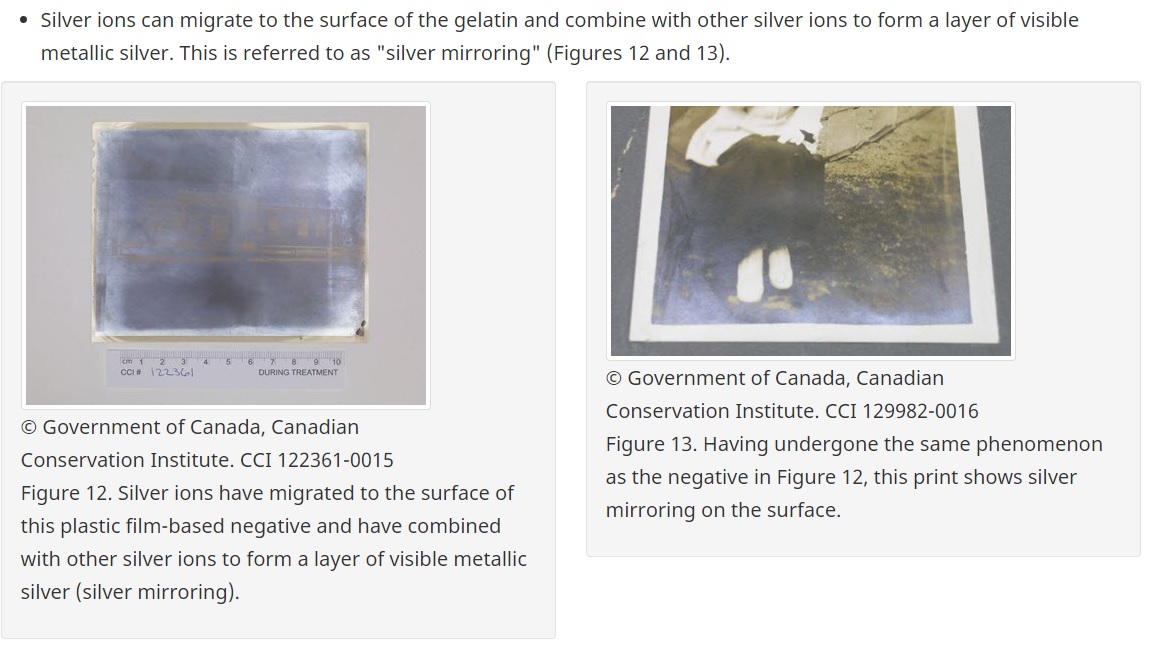
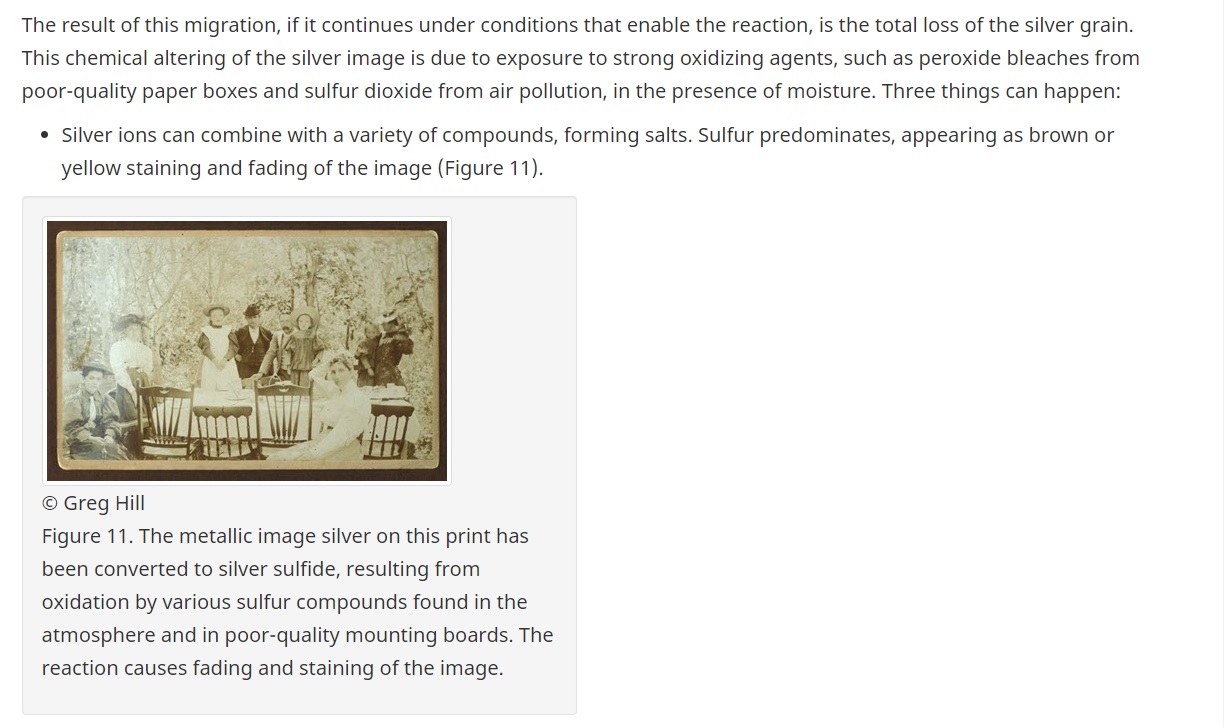
The effects of migrating silver ions.
Courtesy of the Canadian Conservation Institute, Government of Canada.
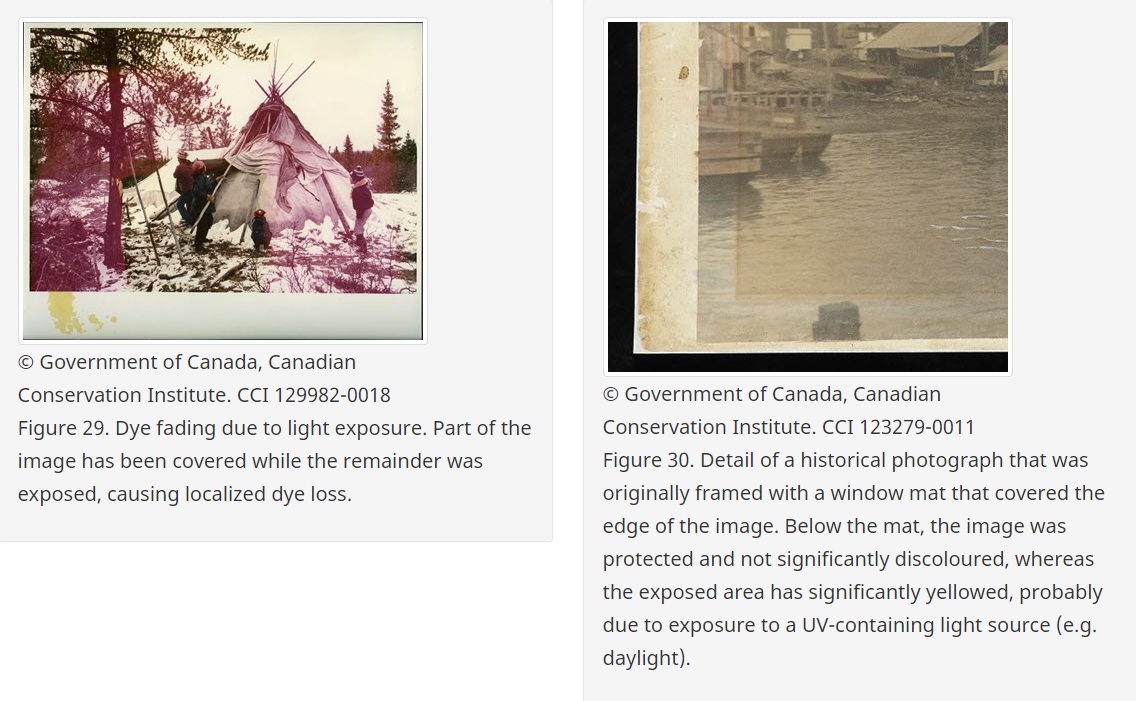
Examples of light exposure and its effects on photographs.
Courtesy of the Canadian Conservation Institute, Government of Canada.
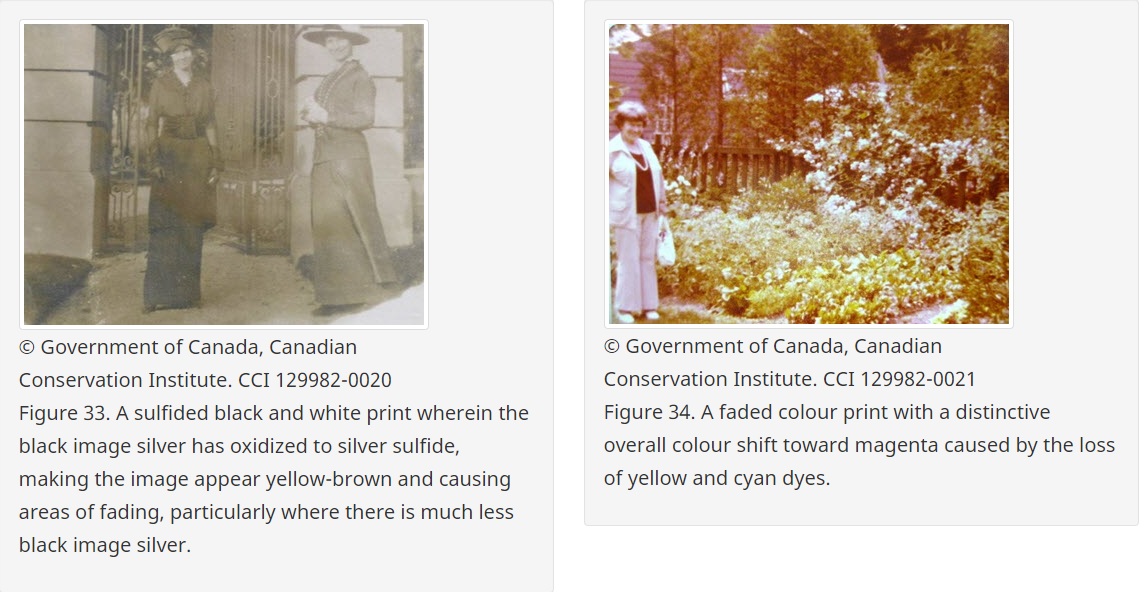
Left: example of silver oxidisation and right: colour shift due to loss of dyes.
Courtesy of the Canadian Conservation Institute, Government of Canada.

Left: example of how the photograph has begun to stick to the glass. Right: Example of appropriate framing with protective elements in place so that the image doesn't actually come in contact with the glass.
Courtesy of the Canadian Conservation Institute, Government of Canada.
Back to All News